Recently, I has been studying the technology of solar imaging. The most stunning solar photography is the hairy flame of the chromosphere and the huge prominences of the sun soaring into the sky. The chromosphere actually photographed the Ha channel (hydrogen-alpha emission line) at a wavelength of 6562.8 angstroms. The sun will behave differently in this band than it does in the entire visible spectrum.
Solar Ha photography, need to use a solar prominence mirror or a solar prominence filter to complete, these equipment can also be bought in China, the price of a solar prominence mirror with the caliber of exponential growth, the general 80mm caliber of the solar prominence mirror is about 20,000, is really a very expensive equipment. More cost-effective is a rear prominence filter called QUARK, which can be used with ordinary telescopes and is acceptable within ten thousand yuan. Other than that you need a very high quality black and white camera. The equipment I used for the demonstration is as follows:
Main telescope: Explore Scientific 127CF APO F7.5 Refractor Telescope
Solar prominence Filter: Daystar’s QUARK Solar Prominence Filter (built-in 4.2x Chromosphere version)
ERF Filter: R filter (used to act as ERF filter)
Main camera: Apollo-M MAX (IMX432) monochrome camera
The combination of Apollo-M MAX and QUARK can achieve the best focal ratio and the most appropriate sampling rate close to F30, which can be said to be a perfect solution to the problem of excessive sampling rate left over for many years.
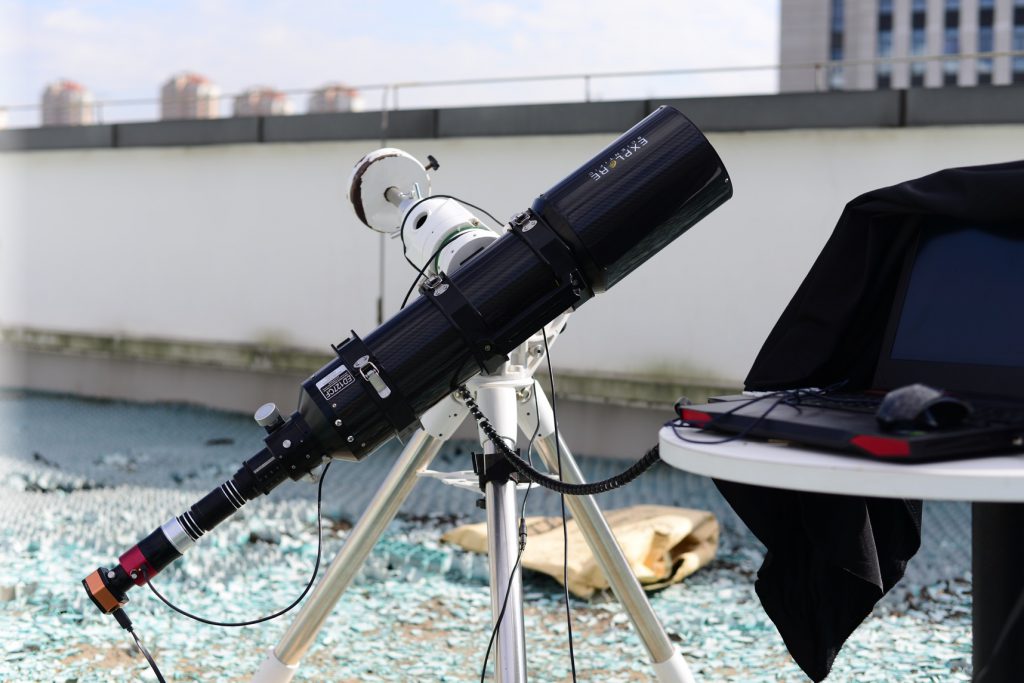
Below, I will share all my practical experience from shooting to post processing.
Ha Solar photography tips
Everyone’s equipment is not the same, in the shooting, parameters need to adjust, but the general principle is similar.
1. Exposure, Gain, Format and Histogram
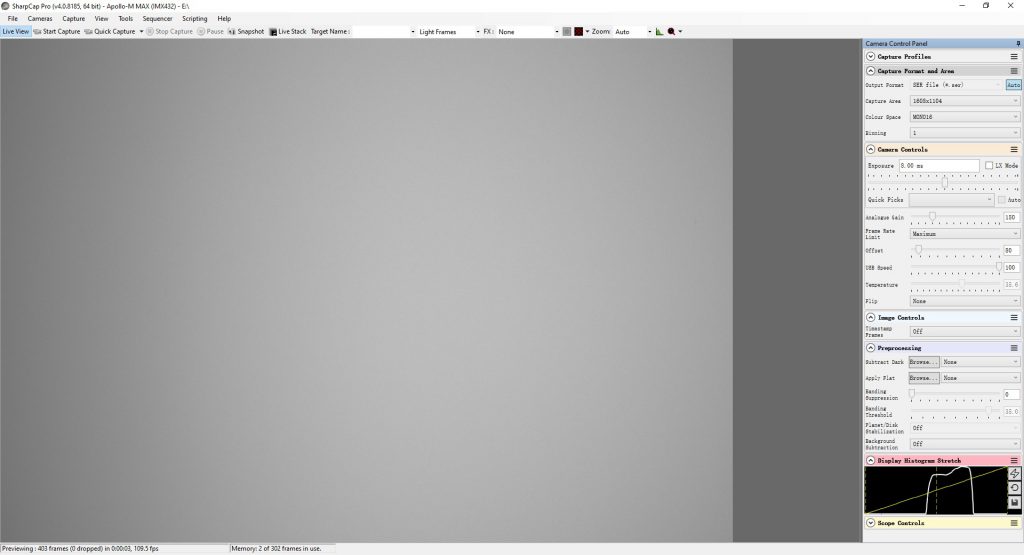
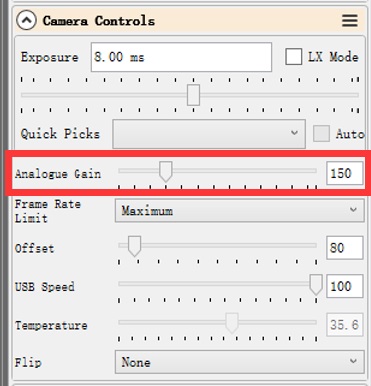
Ha images are far less bright than white light, so we must turn up the gain, ES127+QUARK+Apollo-M MAX combination, Apollo-M MAX set to 150 gain is basically appropriate (HCG open is 146 gain), exposure 7-10ms.
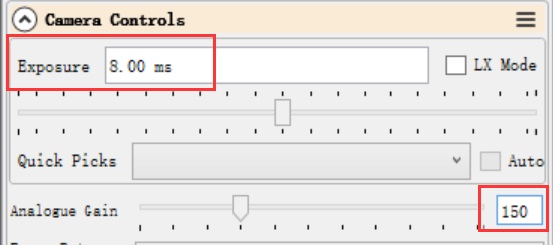
At this point, the histogram’s maximum brightness is about 70%. 70% histogram brightness, whether positive or negative color photo effect is good.

In addition, recording RAW16 is better than RAW8, which can give full play to the advantages of the camera’s high full well (full well of 150 gain is 18700e), especially when the sun’s edge and solar prominence are photographed together, and sharp solar surface features and solar prominence details can be obtained at the same time.
2. Eliminate Newton rings
Any camera with a Solar Ha filter will have an interference stripe. This stripe can be eliminated by tilting the camera’s tilt plate. Apollo-m MAX has a big format of 1.1 inches, so Newton rings will appear to have many circles.
First, when we point at the sun, we can see Newton rings clearly out of focus.

Next, use a wrench to adjust the tilt plate at the front of the camera. (Remember to adjust a set of tilt screws, the other two screws should be properly loosened, otherwise the plate will be overstressed and deformed.)

By adding a tilt of 2-3mm in one direction, Newton rings can be completely eliminated. Remember: Newton rings must be eliminated by tilt adjustment, not by flat frame. I’ve tried it myself a few times, and it doesn’t work.
Once Newton rings are gone, we can begin to imaging the Sun.
3. Focusing skills
When focusing, it is recommended to select the active region with the most prominent features on the sun. Such an area has more details and features, and it is easy to judge the accuracy of focusing.
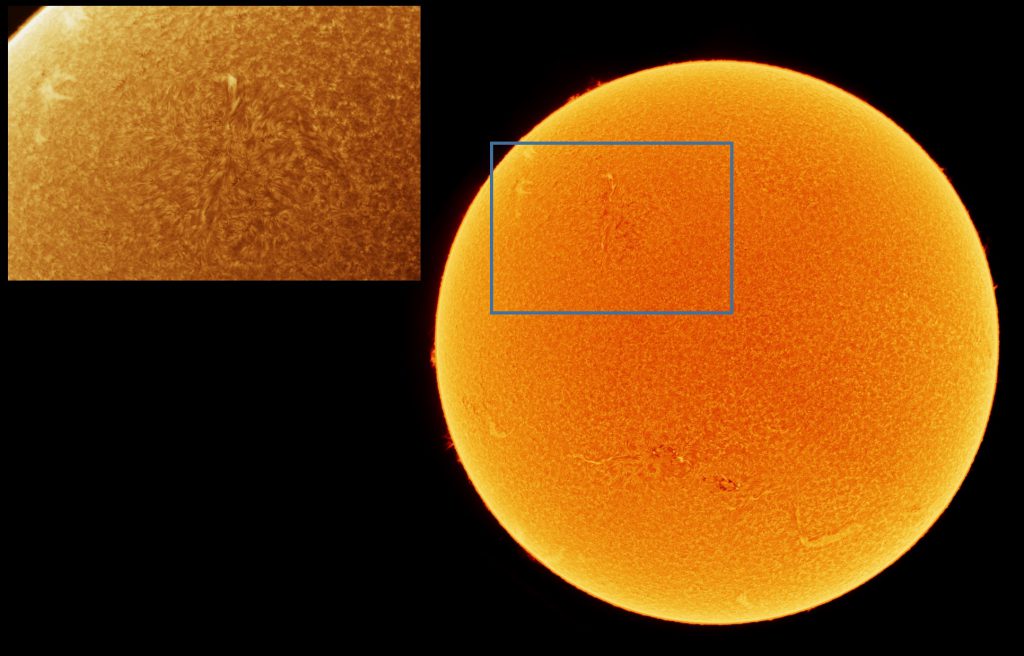
Generally, when focusing is fine, and changing areas does not require refocusing. Unless more than 15 minutes, telescopes exposed to sun light may exhibit significant thermal expansion and contraction resulting in changes in focus.
Now, there are some more practical tips:
1) Preview and stretch the image to improve the contrast of the image, which is conducive to judging the focus.

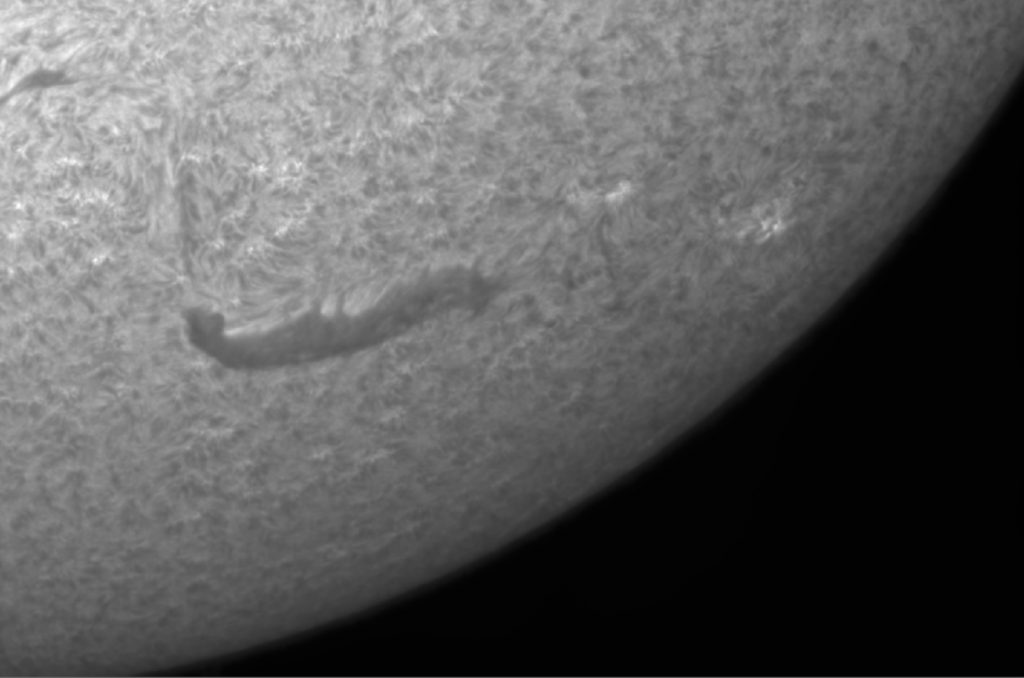
2) Zoom in 150%-200%, so that the details are larger and it is also good for observing the changes in clarity of small details.
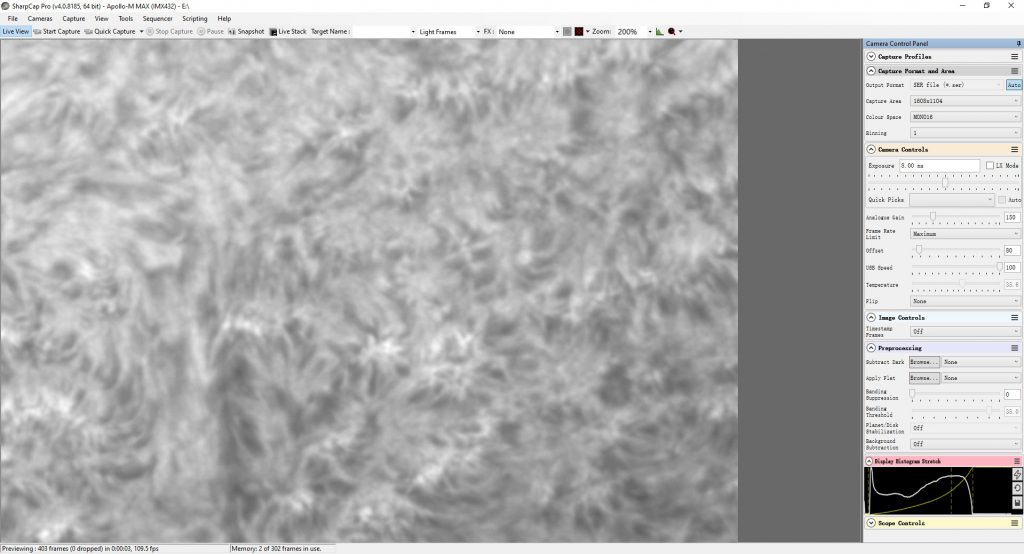
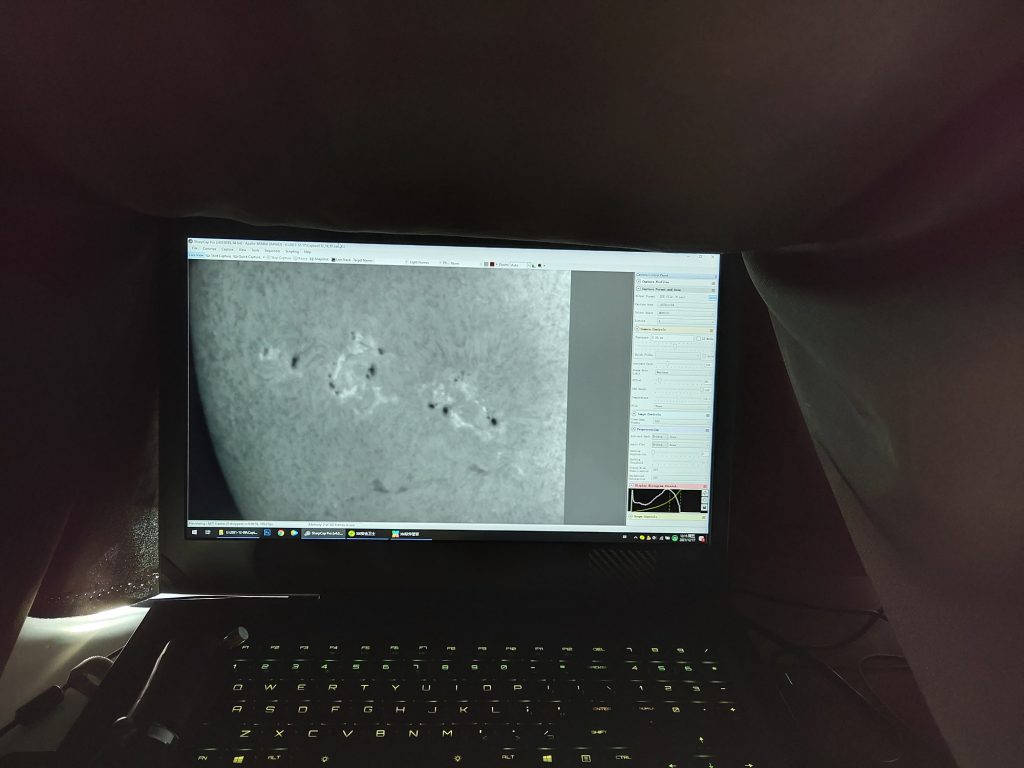
3) Create an artificial darkroom by covering the screen with a large black curtain, so that the screen will be clear and no reflection.
4. Photograph each feature area
Not every region of the chromosphere is worth photographing, unless you want to make a full disk mosaic. Normally, we would operate a telescope and look at the entire surface of the sun, remembering where there are flares, where there are sunspots, where there are prominences. Then record each feature area one by one.
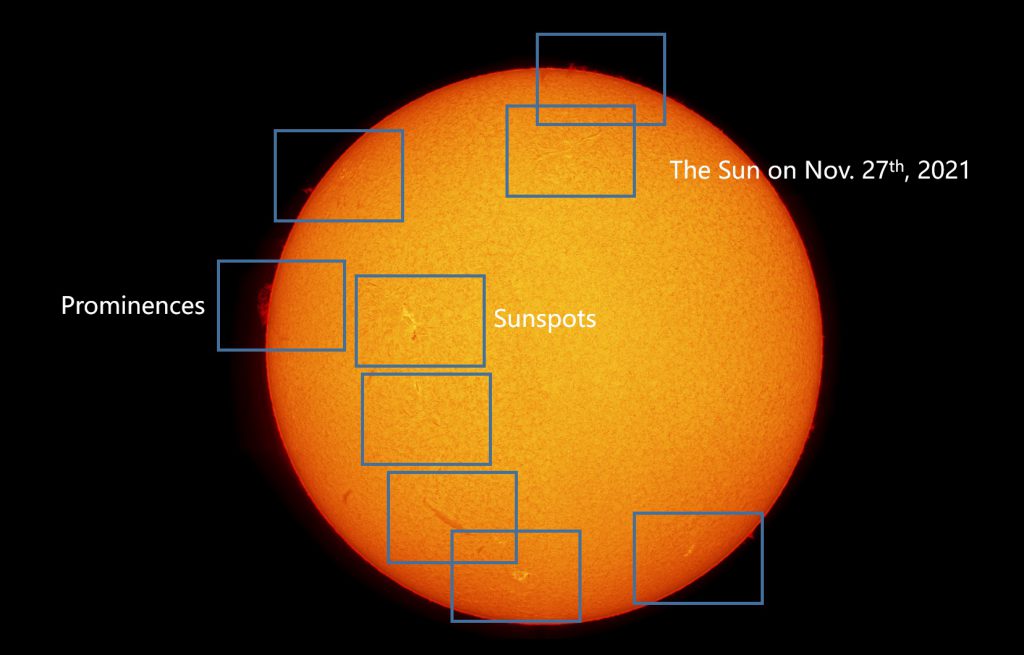
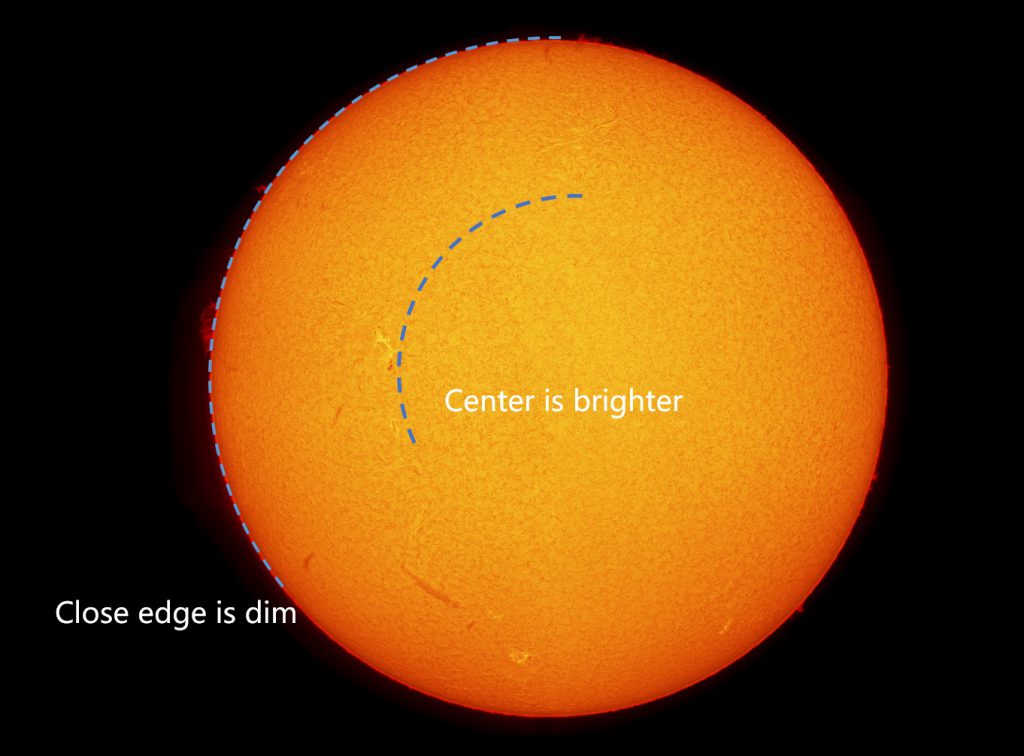
The brightness of the central and edge regions of the sun will be much different, so if you are in pursuit of perfection, you can adjust the exposure time appropriately (it is recommended not to move the gain), keep the maximum value of the histogram is about 70%. Or we trying to save time, we can shoot all areas with one exposure and then lighten or darken them later.
The active areas of the chromosphere change so quickly that even half an hour can make the same area look markedly different. That’s why a lot of masters like to do time-lapse videos, to record the eruption of a solar prominence, and the movement of prominence it’s very impressive. Today we are not going to talk about the complicated gameplay, we only need to understand the core of imaging and processing.
5. Flat frame shooting techniques
I have also experienced many failures in flat frame shooting. If the flat frame is not good, the solar videos that I worked so hard to shoot on that day is basically in vain, and it is impossible to produce a good image. Deeply aware of the importance of flat frame for Ha imaging. There are a few things to note here, if you can get the flat frame right, then the post processing will be very comfortable.
1) After aiming at the sun, defocus more and shoot flat frame video
This is the most natural and effective flat frame shooting method, because QUARK has a high magnification, for my 127APO, I only shot part of the sun, so use the sun as a huge flat field light source.
2) Gain is consistent with light frame
The consistency of gain is very important. Subtracting photos with different gain will increase noise, so I have consistently emphasized that only adjust exposure, the gain does not change. Just for when you take flat frame, you can shoot with the same gain. Flat frame brightness can be consistent with bright field, 70% histogram brightness is good . If you want to get 50% brightness like deep sky imaing, that’s fine.
3) Keep the format consistent with the light frame
If RAW16 is used for light frame, RAW16 is used for flat frame. When using apollo-M MAX, use RAW16 for light and flat frame shots to maximize the camera’s tolerance.
4) Shoot 500 frames to make master flat
Don’t use single flat frame as master flat, be sure to take 500 frames stack the master flat, this can better smooth out the random noise of the flat. Flat video at 500 frames is very fast, only need a few seconds.
5) Shoot flat in multiple areas
You can shoot flat in the center of the sun and slightly off. The reason is that when the imaging train aligns with different areas, the distribution of flat frame light intensity will vary due to internal reflection of the optical system, and sometimes the flat field shot by the central area cannot perfectly smooth out some areas. Therefore, more areas will reduce the risk of calibration failure.
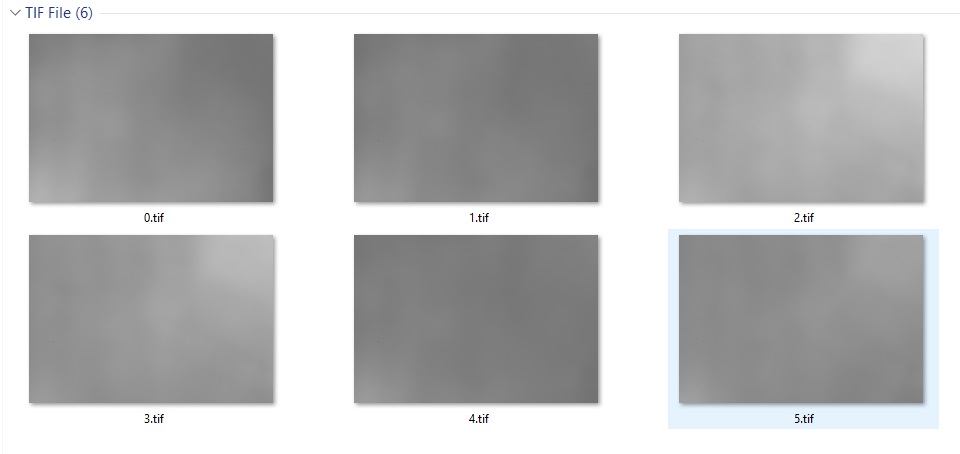
6) It is recommended to shoot two sets of flat field
One before the shoot starts, one before the shoot ends. This is a better way to avoid the risk of some calibration failures. Because I once moved the Angle of the camera between shots, the result was that the video with the changed Angle could not be calibrated with the master flat.
Interesting question 1: Can the flat field of one telescope be used by another?
Surely not, you might say! But I found that under certain conditions it can.
For example, the flat field of the sun taken by ES127+QUARK+Apollo-M MAX, if QUARK and Apollo-M MAX are removed together, and put them on 80APO F5 refractor, the master flat of 127APO can be used to calibrate videos from 80APO.
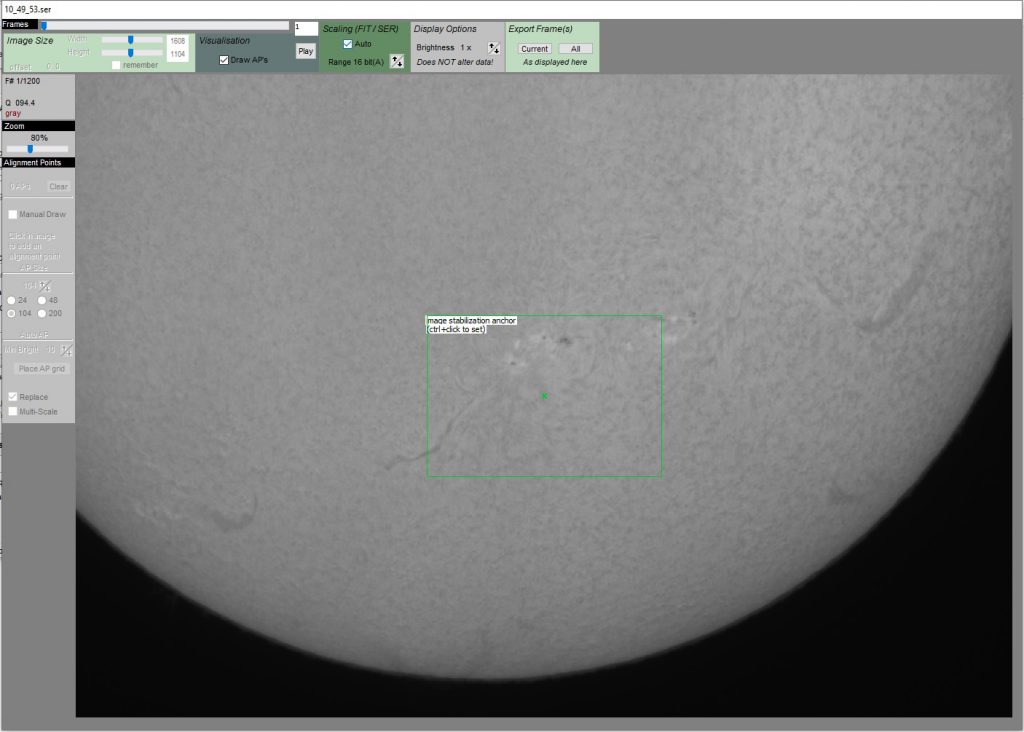
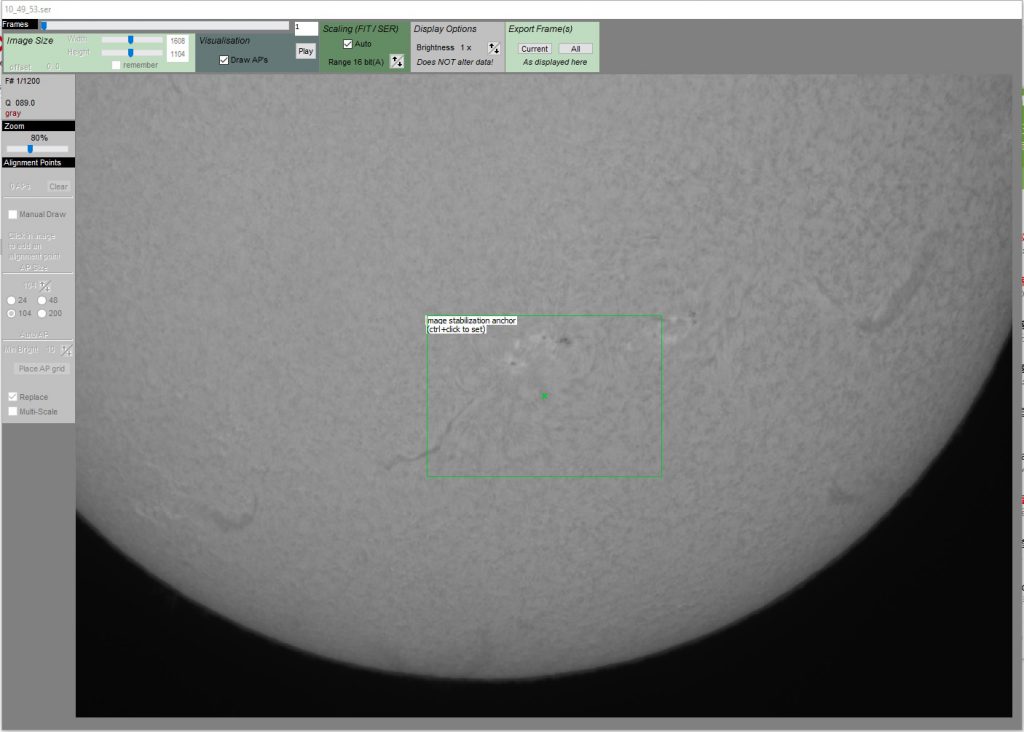
Why do I use it that way? Because the field of view of the 80F5 is too large, the defocused sun cannot cover the entire screen.

I can’t use a flat field like that, and that’s what it would look like.
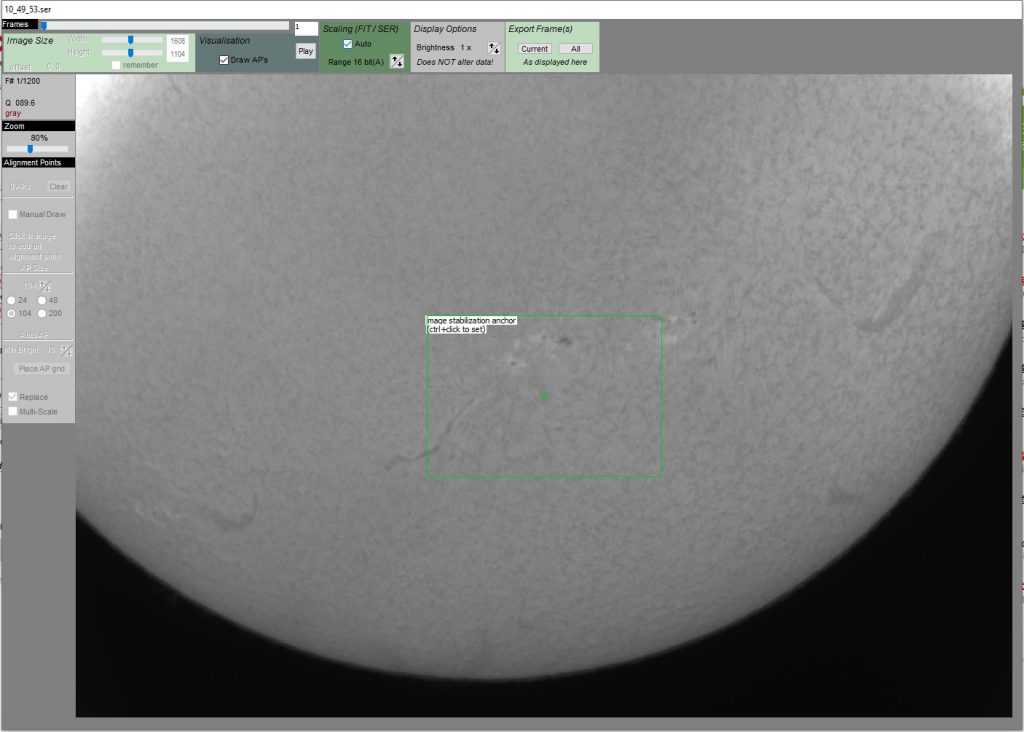
So I have no choice but to find another way make flat. Someone say bubble wrap is good for make flat frame, but I haven’t tried it yet.
Interesting question 2: Can the master flat shot a few days ago be used for the video shot later?
That’s also possible. There are more conditions. For example, the gain should be the same, the camera Angle hasn’t changed significantly, and so on. If the calibration effect of the flat field taken today is not ideal, you can try to use the master flat taken a few days ago to see the effect. If the effect is OK, it can be used.
Ha solar video pre-processing
1. Stacking flat fields
Drag flat field video into AS! 3, select Create Master Frame from the menu and you can quickly stacked the flat field video into a single master flat (it only takes a few seconds).
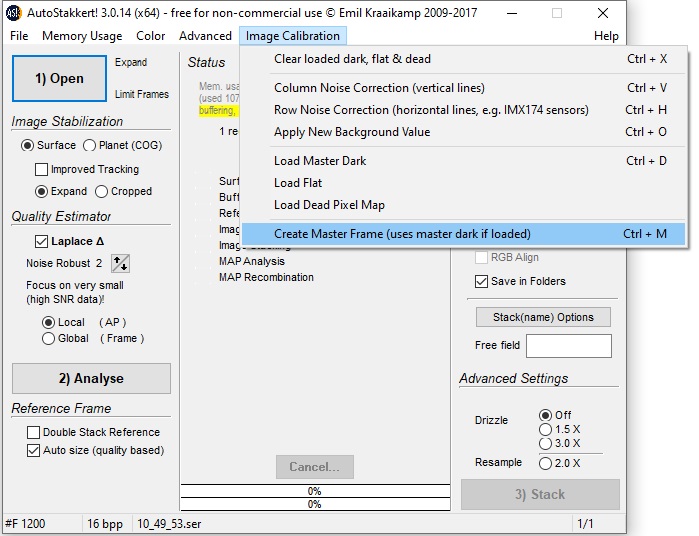
Export files to 16-bit TIF format.
2. Stack solar videos
1) Import videos
After the import, you can see that the light and shade of the image are not even because we haven’t loaded the master flat yet.
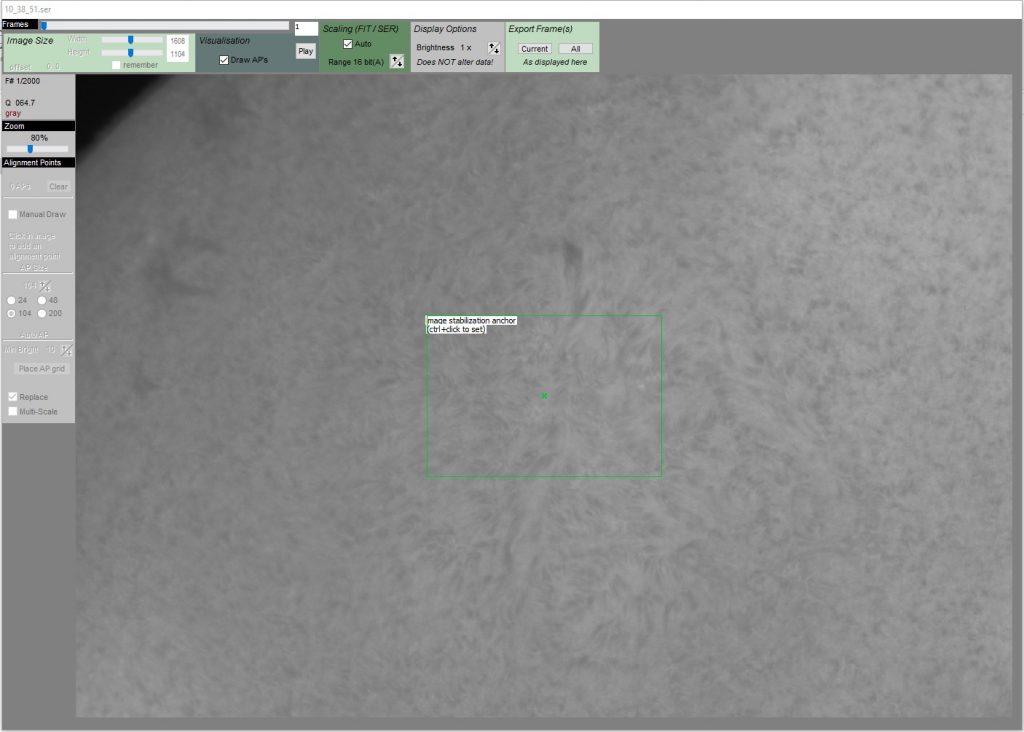
2) Import the master flat
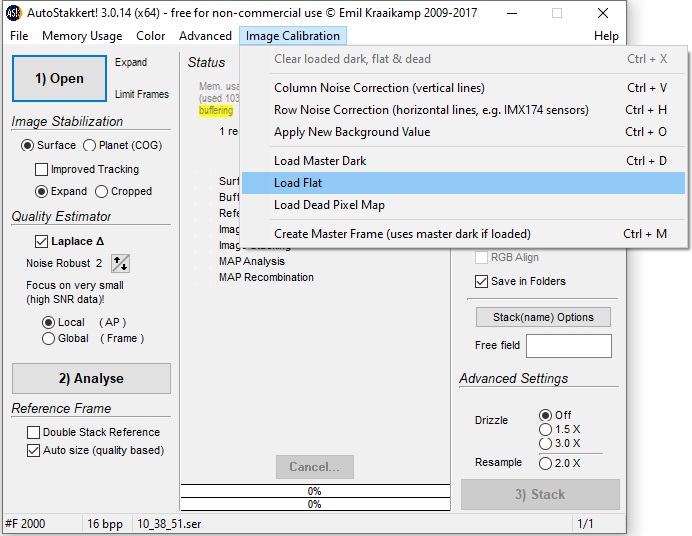
After importing the master flat, check that the image is sufficiently uniform. If there is no problem, we can proceed to the next step. But sometimes it’s not clear what went wrong in the master flat and the calibration is even worse. At this point, the a lot of flats that were taken before will come in handy. You can try several different master flat to find the best one to use.
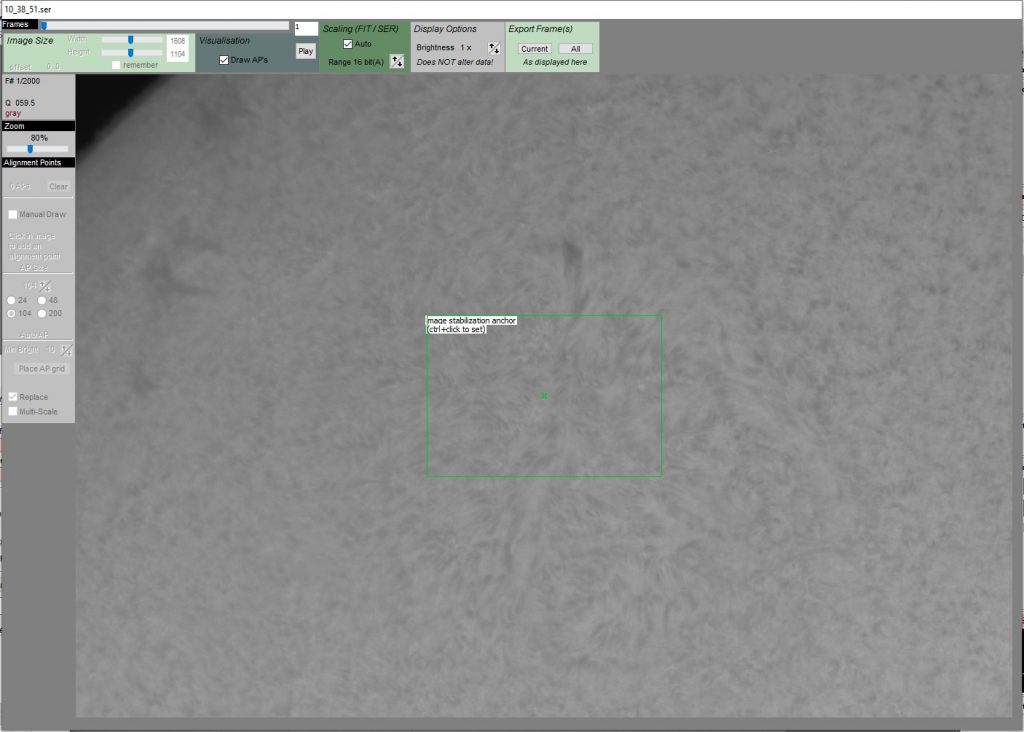
3) Stacking according to the normal process
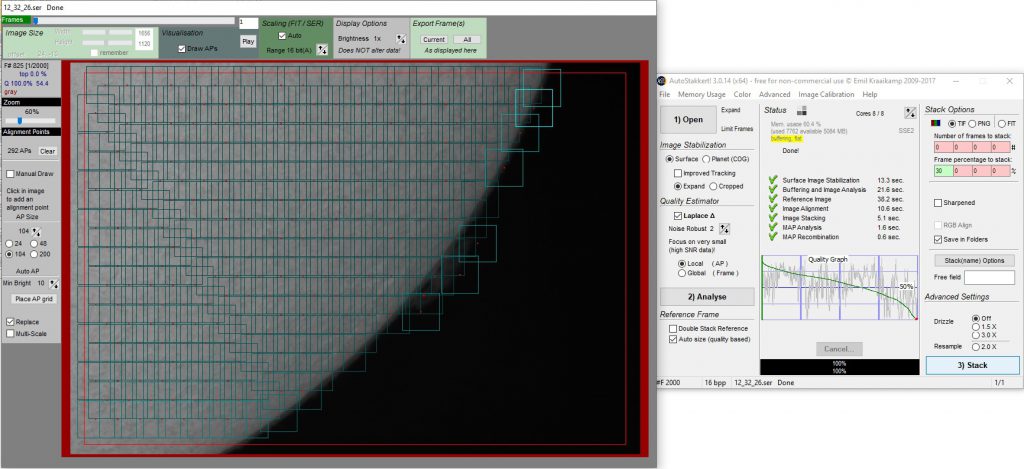
The first step is to select Surface mode, Expend mode, noise robust set to 2, and press the Analyse button.
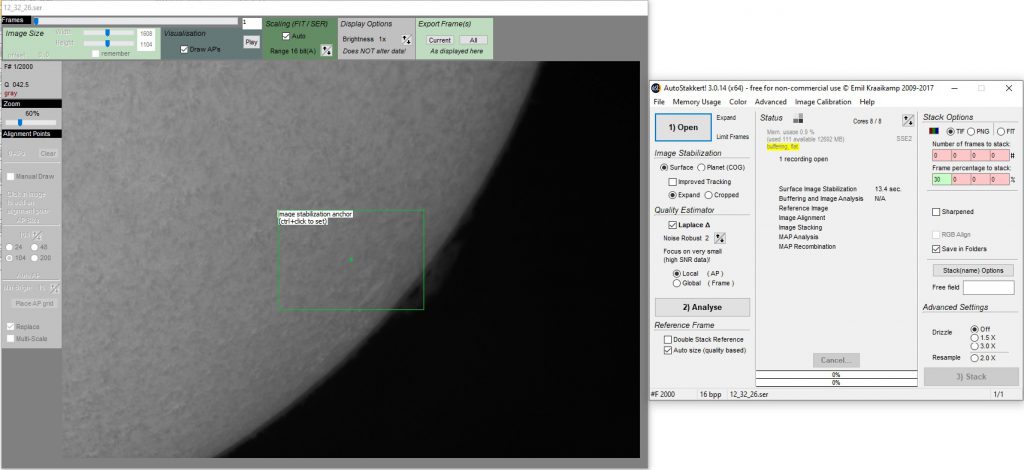
Wait for analyse finished.
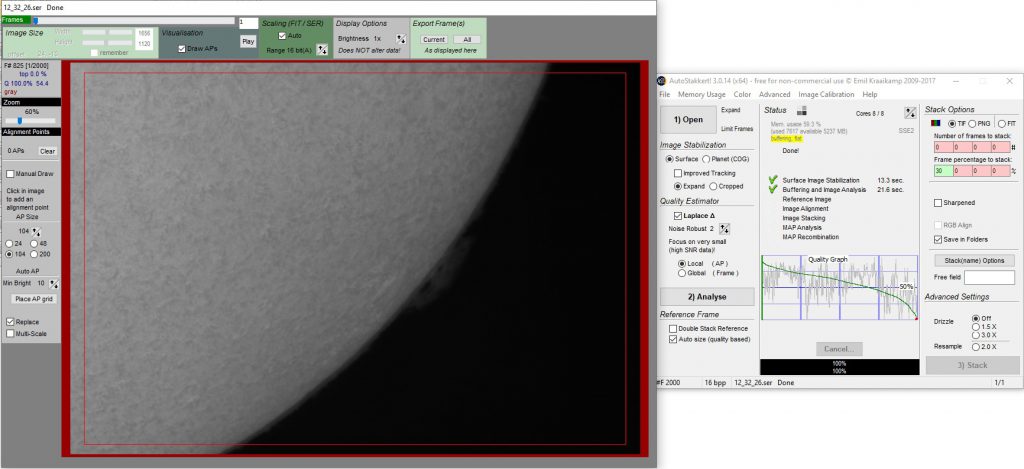
To add the APs reference frame, I usually set the size to 104 and the Min bright to 10. If the prominence is not completely covered, manually add several APs.
On the main interface on the right, the output file format is TIF, and the overlay ratio is set to 30%.
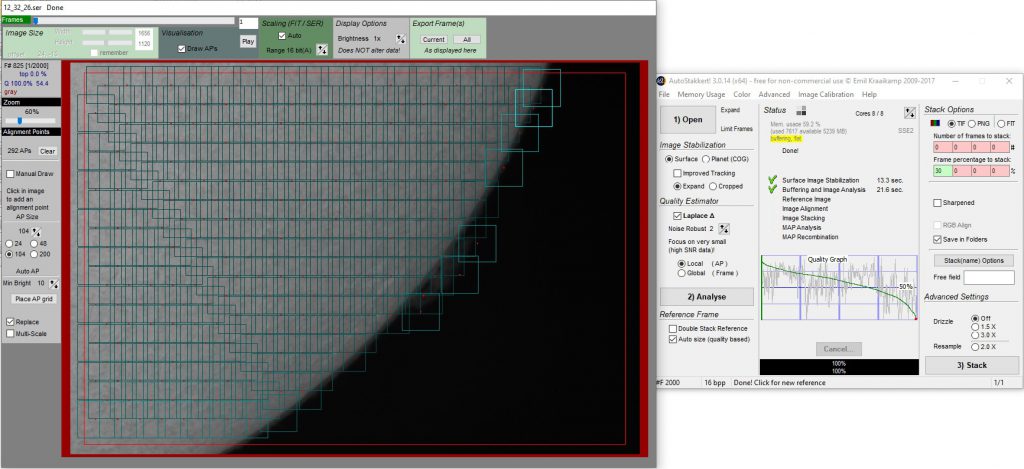
Once you’re done stacking, AS!3 will create a folder with the stacked files in it.
Post processing of Ha solar image
Stacked image, there are many kinds of processing software can do post-processing, finally found that IMPPG is best to make invert image . However, the parameters in IMPPG are very difficult to adjust, and it took me many attempts to find the suitable parameters.
1. Sharpening and deconvolution parameters of IMPPG
1) For images taken by Apollo-M MAX, the parameter of deconvolution is different in different seeing conditions.
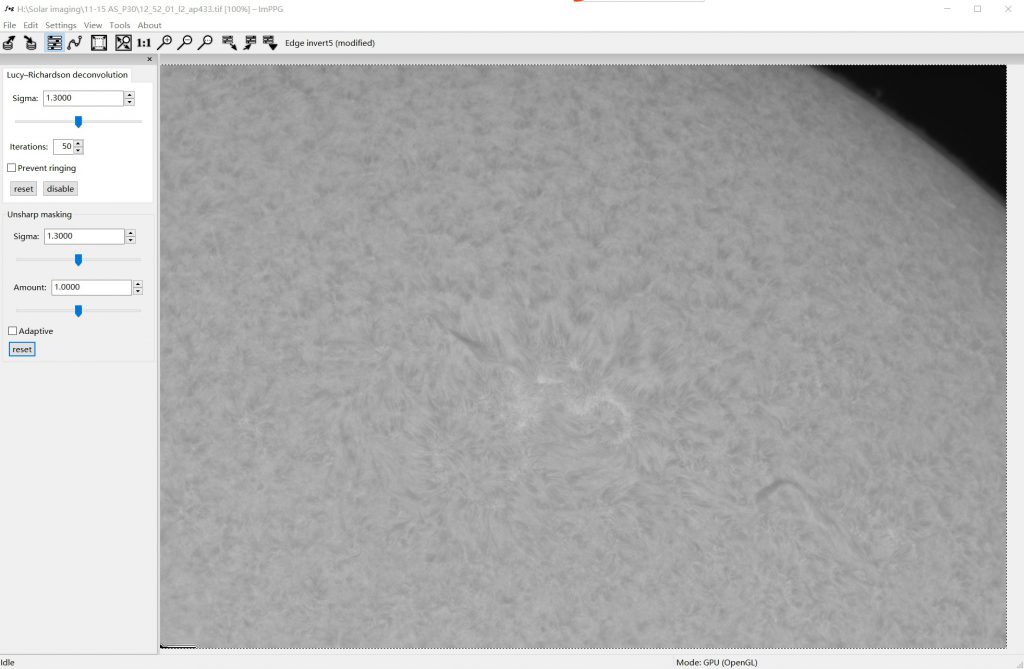
Good to Excellent seeing: Sigma set to 1,
Fair seeing: Sigma set to 1.3,
Poor seeing: Sigma set to 1.5-1.6,
Iterations set 50.
2) Sharpening parameters are based on the seeing. If the seeing is good, set Sigma to 0.5 and turn up Amount to 2-10, it will be very delicate and clear. If seeing is poor, set Sigma to 1 and turn up Amount to 2-20 as needed to have enough detail.
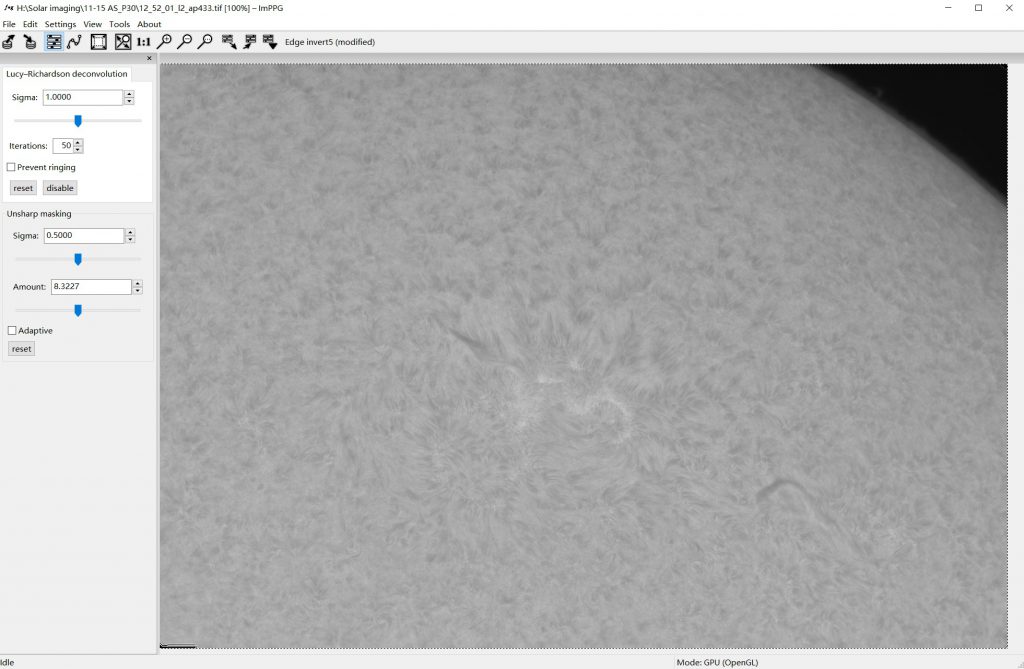
2. Imppg invert color tricks
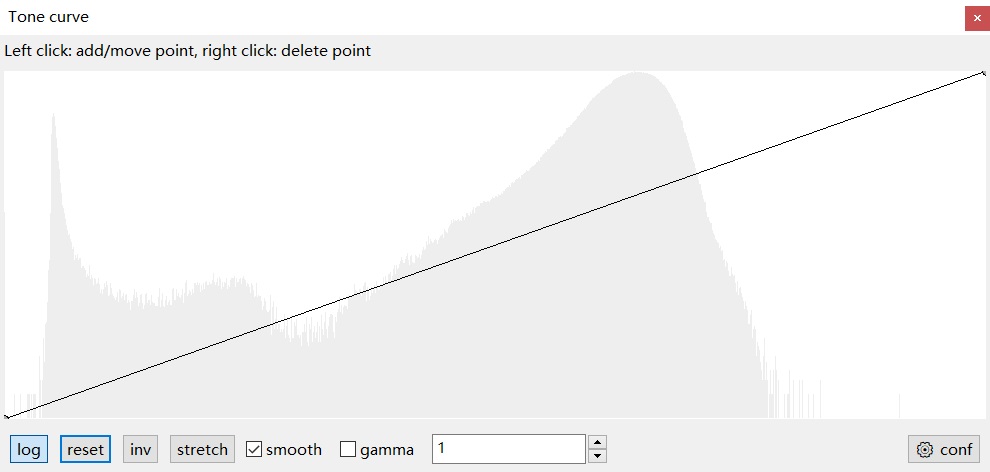
1) Open the built-in Tone Curve tool
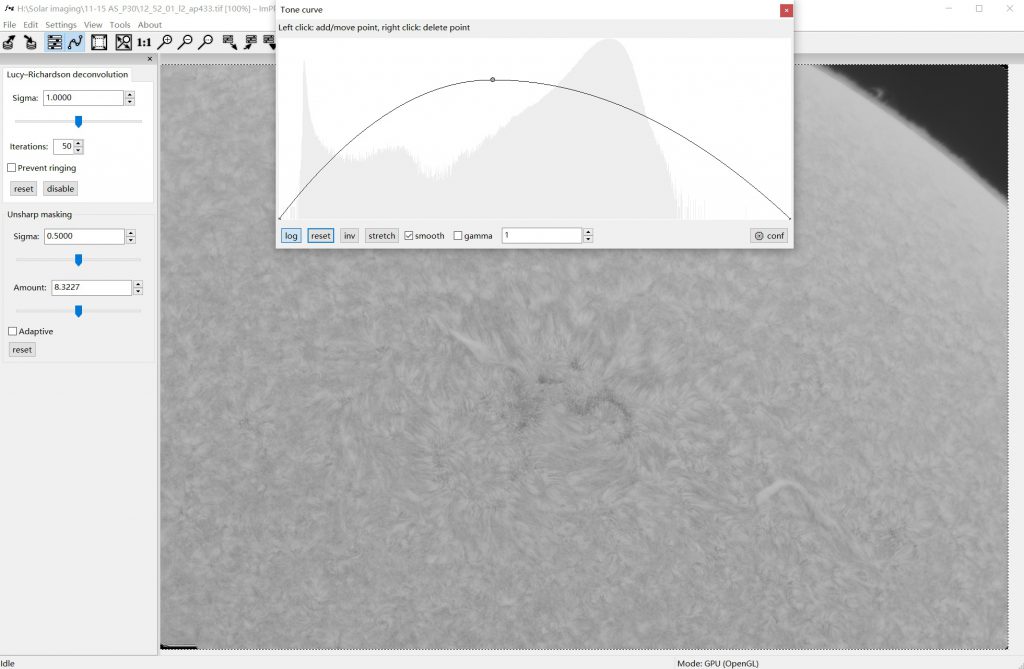
2) Make a simple invert curve
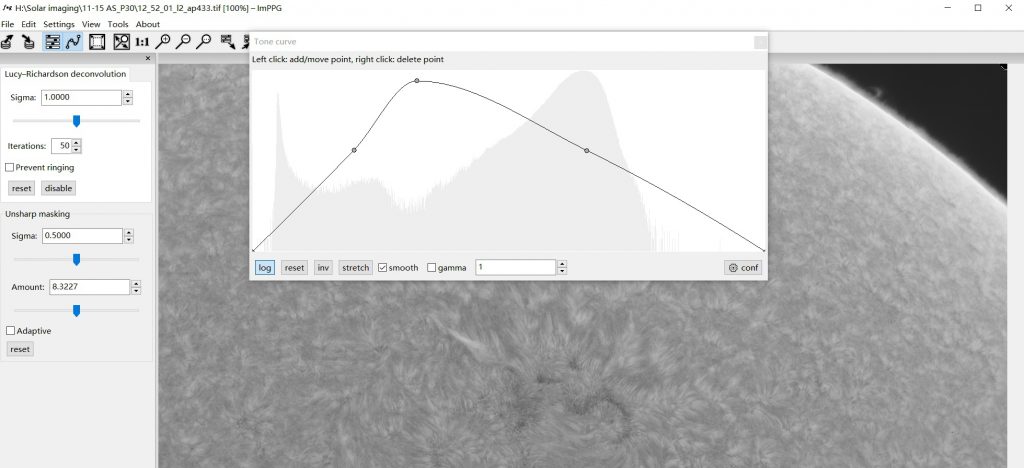
3) After adding two fixed points left and right, drag the middle slider to find the brightness position of the sun’s edge.
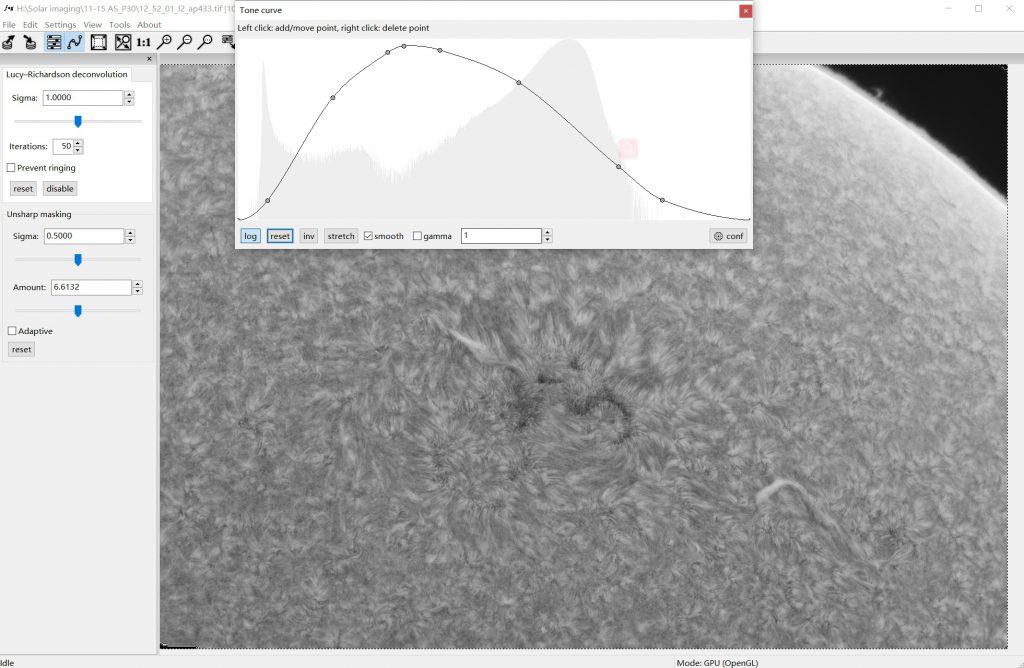
4) Increase more sliders, tune the curves of dark and light parts and increase the contrast.
5) The image is saved in 16-bit TIF format.

The most important thing about sharpening: don’t be too violent. Chromosphere is plasma gas, there is no sharp edge, so how to grasp the degree of softness and sharpness, is the embodiment of post-processing skills. At the beginning often will be more pursuit of details, but after some time, we will know how to balance softness and sharpness.
3. Post-color palette in Photoshop
In photoshop, we needs to do is add color and contrast of the image to enhance the aesthetic of the image. The first thing to do is change the mode of the image from grayscale to RGB so that color can be added.
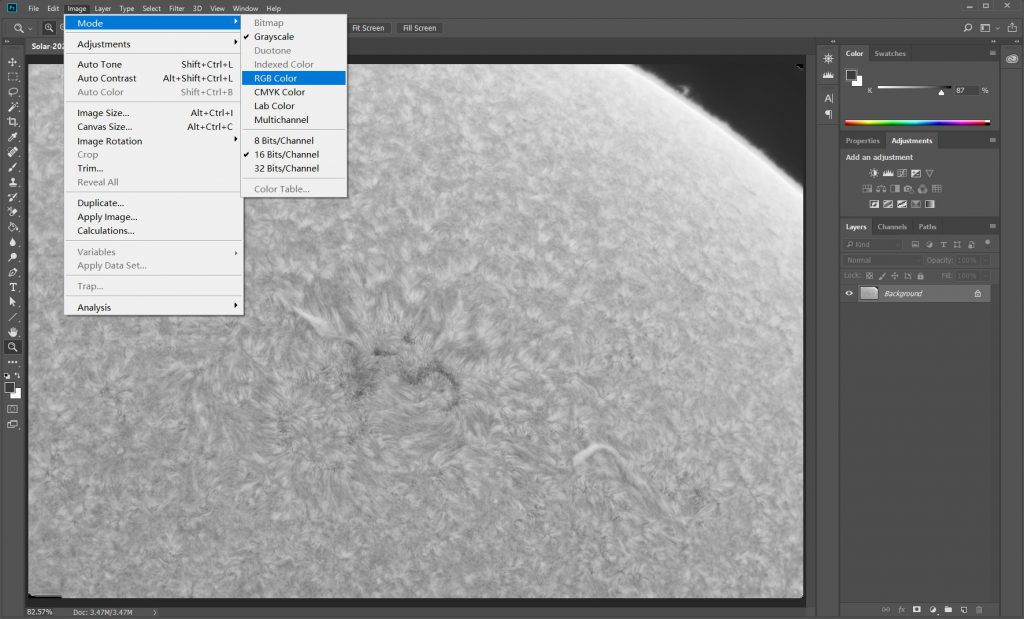
After that, we can start to mix the colors. There are two ways to adjust the sun’s color, one is the Level tool, one is the Curve tool.
Level toning method
The tone of level is very simple and fast, we only need to set the median value the RGB channels.
R=1.6, G=0.8, and B=0.2.
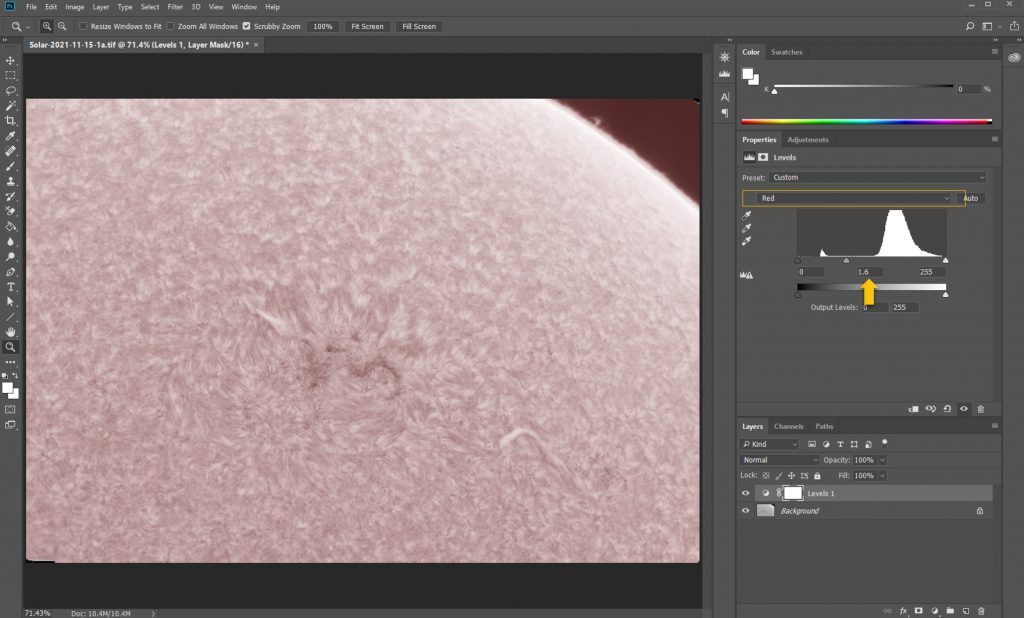
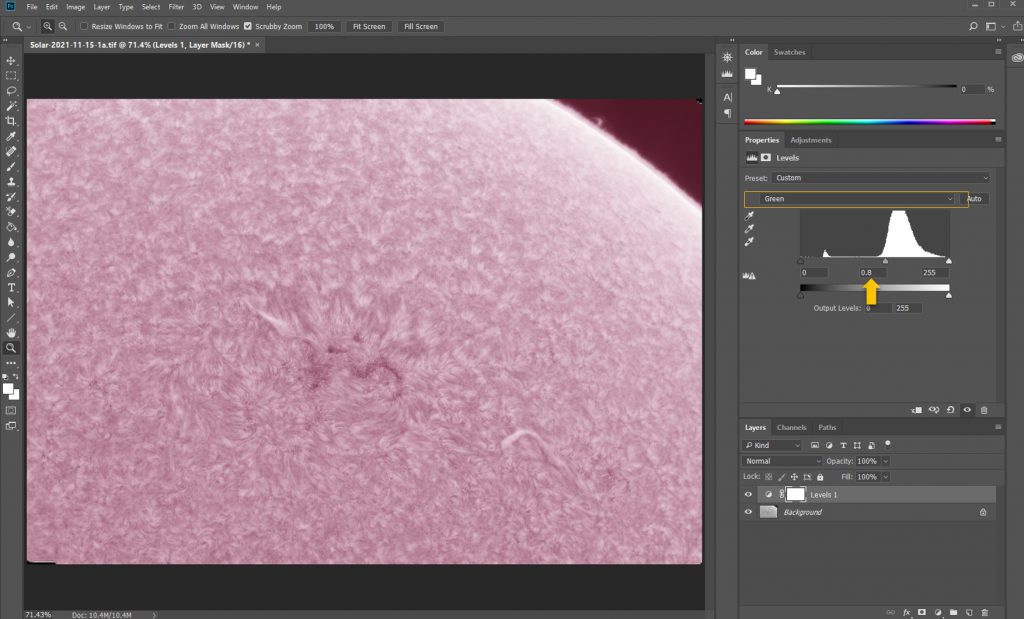
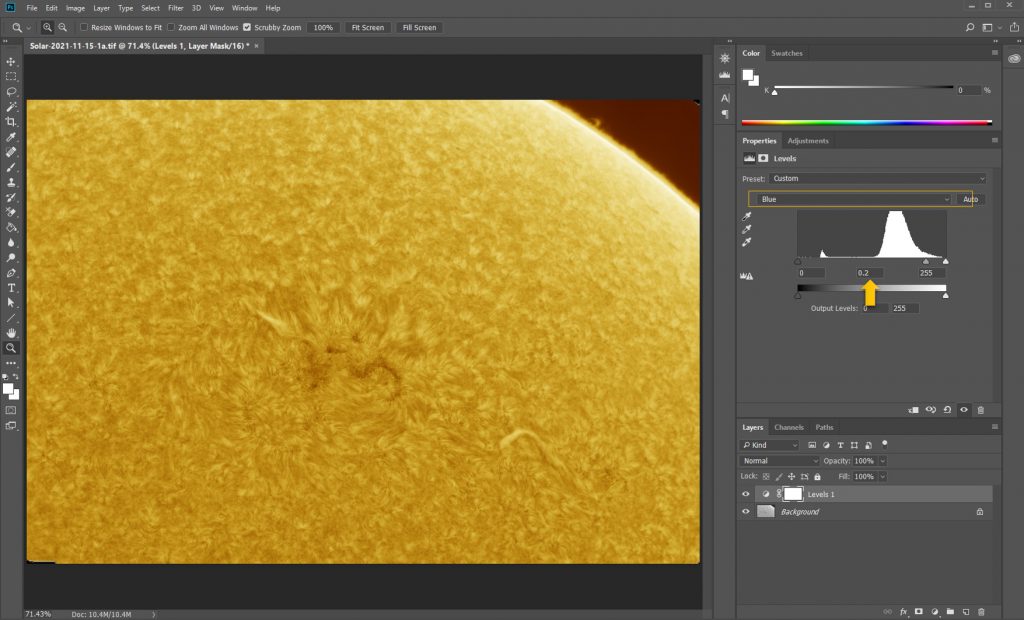
So we get the color, it’s really fast, and it works really well. Very suitable for beginners, because all values are fixed, no risk of failure. Of course, if you like make image more colorful, you can learn the following Curve method.
Curve toning method
The adjustment method of curve is more test skill, it does not have fixed numerical value, only three points.
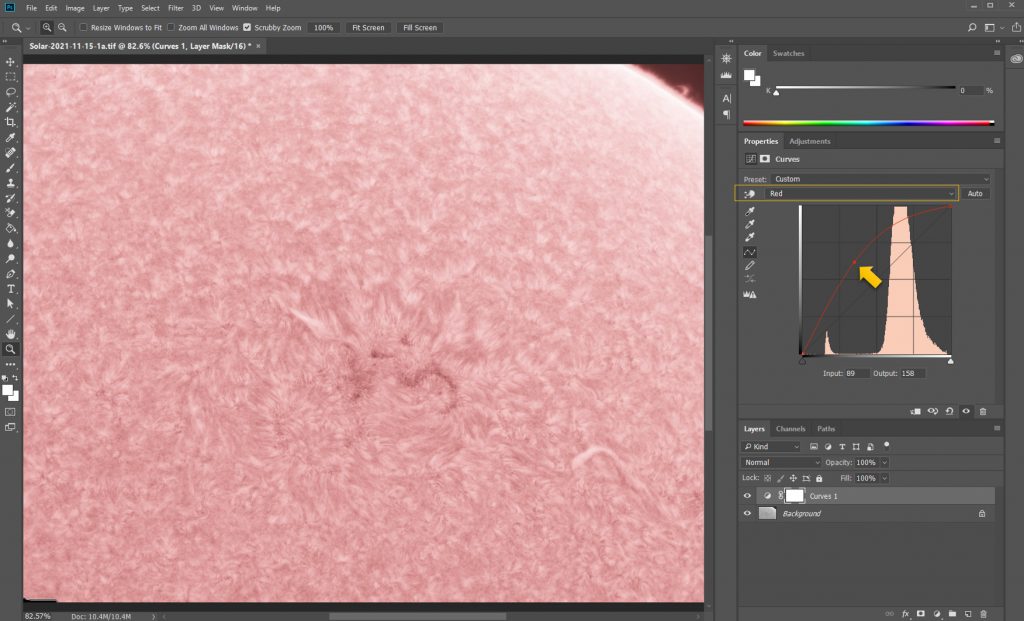
First ,we need to add a curve layer. Then select the Red channel on the layer.
The R curve pulls up, not to much.
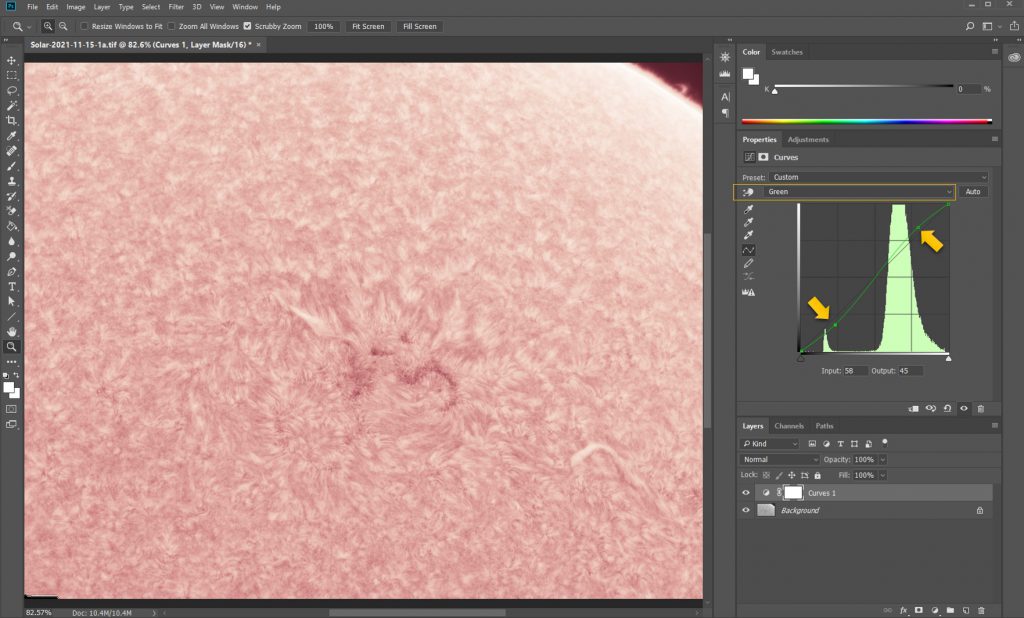
Make the G curve an “S”, and don’t bend too much.
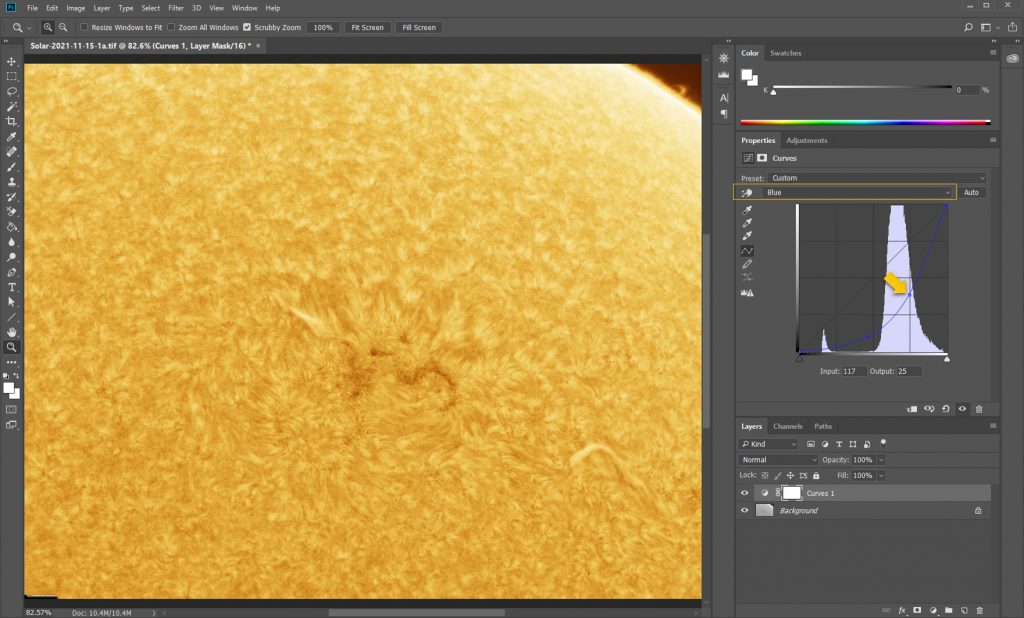
B curve pull down, a little bit more.
Once the 3 curves are created, the color will come out. At this time, is to fine-tune the curve of the three channel, find the most comfortable color effect can be.
You can then add a new curve layer to optimize the contrast of the image. This depends on the individual’s perception of the image, adjust the curve until you feel perfect.
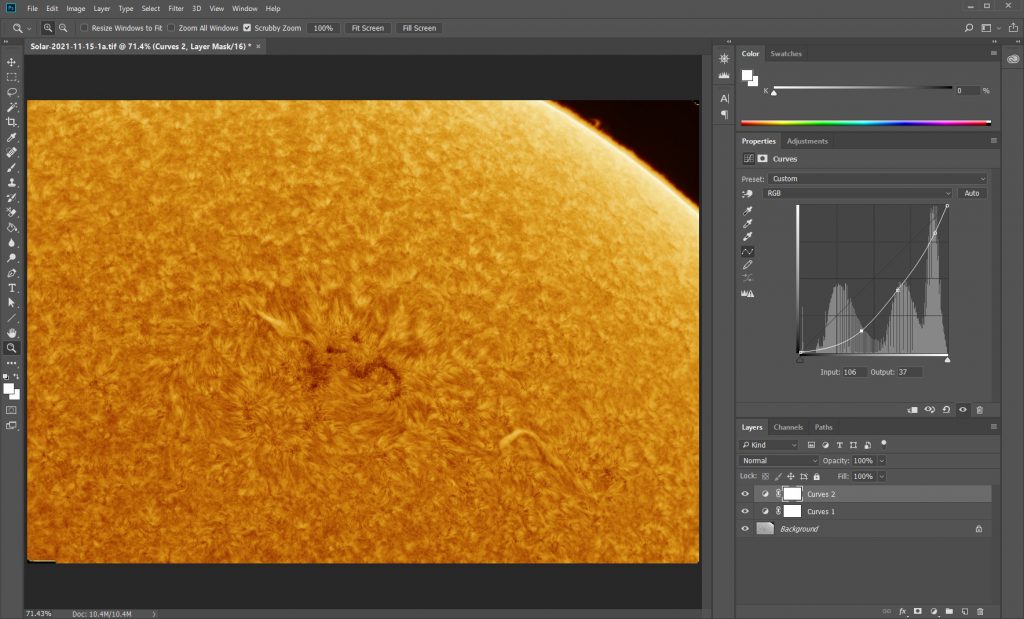
Color mixing is mostly about personal aesthetics, as long as you feel comfortable and good-looking. I personally prefer to use curves because the color changes are more vividly and the image looks more advanced.
Add photo Information
When we done post-processing, make sure you describes the parameters, equipment, when and where the photo was taken, and the person who signed it. This is tradition, in order to facilitate the people looking at the photo can immediately know the information to judge the quality of the photo, give a like or give some suggestion.
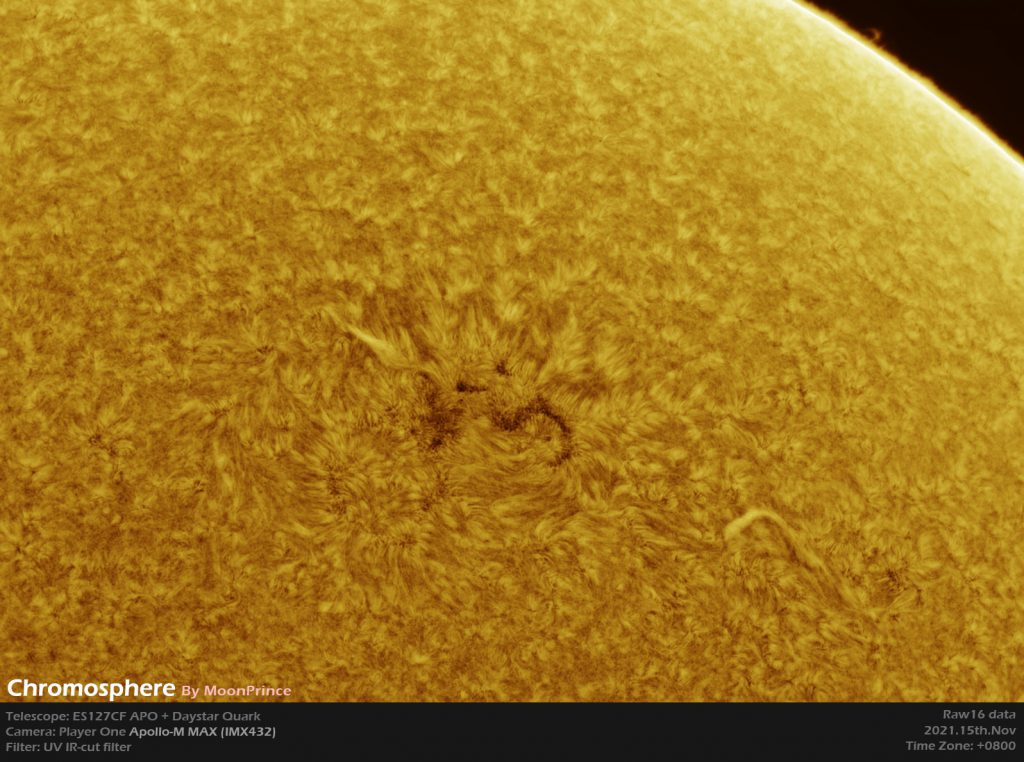
The final result was amazing when I saw it for the first time. I didn’t expect apollo-M MAX camera with QUARK to achieve such a effect, it seems that this new camera has great potential in solar imaging.
This is my summary of the Sun Ha shooting and post processing of all the skills, welcome to leave a message in the comments section, if you don’t understand some parts. If there is something wrong, please let me know and I will correct it. Some friends say that they want to learn sun Mosaic and some higher level of imaging, I must to make more research and try more times to get enough experience for writing a higher level of the tutorial.
-白底-small100-200x78.jpg)
Hi
Try using a 2 inch diagonal with the Quark, it will shorten the focal distance the draw tube has to travel and lessen the chance of any sagging and misalignment
Thanks, Les. I use rotolock to align up, diagonal is also an option 🙂
Thanks for the write up!
Would it be possible to share a raw tiff stacks (just stacks, no other processing) for the same session and same target – preferably showing protuberances and surface structure – with similar amount of frames
(1) 16 bit capture mode and
(2) high speed mode
using Apollo m-Max?
I am interested in this camera but I would like to see what really is the difference using 16 bit vs high speed mode using this particular sensor. For this processing of stacks recorded at 16 bit and high speed mode would be needed.
Additionally, could you confirm what are max frame rates at full resolution with 16 bit mode and high speed mode (assuming that pc ssd or usb connection or too long exp time does not cause bottle neck for data transfer)?
I shared some Tiff in this post, 16bit mode. I took very a few in 8bit, I can’t remember which one is RA8 now, the original was deleted to save space.
https://solarchatforum.com/viewtopic.php?t=36188
Very useful tutorial, many thanks👍
You are welcome, Dave.
Can you describe how to make a time lapse video , I tried and it was very jumpy , I could not get it to align , and what is ACS do ?
We didn’t try time lapse video before.